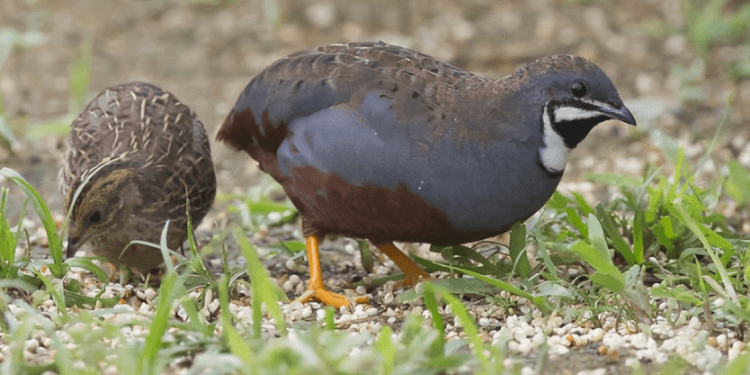
Rutin chickens, also known as blue-breasted quail, are gaining popularity among poultry enthusiasts. Their unique appearance and docile nature make them an appealing addition to any backyard.
Rutin chickens, also known as Blue-Breasted Quail, are gaining popularity among poultry enthusiasts. Their unique appearance and docile nature make them an appealing addition to any backyard. But how do you bring these charming birds into the world? The process of incubating Rutin Chicken eggs requires careful attention to detail. This guide provides a comprehensive overview of every step, ensuring you give your Rutin Chicken eggs the best chance of hatching.

Pre-Incubation Preparations: Setting the Stage for Success
Before placing those precious Rutin Chicken eggs in the incubator, meticulous preparation is paramount. These steps will maximize your chances of a successful hatch:
1. Choosing the Right Incubator:
- Temperature and Humidity Control: Select an incubator that offers stable temperature and humidity regulation. These factors are crucial for the developing embryos.
- Size: Determine the appropriate size based on the number of eggs you plan to incubate.
- Types: Consider the two main types:
- Still-Air Incubators: These are more affordable but have temperature gradients, meaning the temperature isn't uniform throughout.
- Forced-Air Incubators: These incubators utilize a fan to circulate air, ensuring a consistent temperature. While more expensive, they generally provide better hatch rates.
2. Selecting and Preparing Rutin Chicken Eggs:
- Freshness: Only use fresh eggs. The fresher the eggs, the higher the chances of a successful hatch.
- Quality: Choose eggs that are clean, undamaged, and free of cracks or blemishes.
- Storage: If you're not incubating immediately, store eggs in a cool (55-60ᄚF), humid environment. Turn them gently twice a day. Keep the eggs with the thicker end downwards during storage.
- Cleaning: Eggs bought online should be rested head up for 4 to 12 hours and then disinfected with potassium permanganate to 37 degrees of warm water for a minute. If the player bought it in the hands of individuals, you do not need to use only warm water to clean it.
3. Sanitization is Key:
- Incubator Sterilization: Before introducing the eggs, thoroughly sanitize the incubator. Use an incubation disinfectant, or a solution of warm water and soap to eliminate bacteria that thrive in the warm, humid environment.
- Egg Sterilization: For eggs bought online, gently disinfect them with potassium permanganate in 37 degrees warm water for a minute, and let them dry before incubation.
The Incubation Process: Nurturing Life Within
The incubation process requires careful monitoring and adjustments to the environment inside the incubator.
1. Temperature Management:
- Optimal Range: The ideal temperature for Rutin Chicken egg incubation is generally between 37.5ᄚC to 38ᄚC (99.5ᄚF to 100.4ᄚF). One source suggests 37.8ᄚC (100ᄚF) for the first 5 days, decreasing the temperature gradually.
- Monitoring: Use a reliable thermometer to monitor the temperature regularly.
- First 5 days: Keep the temperature at 38.2ᄚC
- Days 6-10: Keep the temperature at 38ᄚC
- Days 11-15: Maintain the temperature at 37.8ᄚC
- Days 16-19: Maintain the temperature at 37.5ᄚC
2. Humidity Control:
- Early Stages: Maintain humidity at approximately 60% during the first 10 days of incubation.
- Later Stages: Increase humidity to around 75% from day 11 to day 16.
- Increasing Humidity: Spraying warm water on the eggshells can help during the hatching period.
- Humidity for hatching: Increase humidity to 70% on days 18-21.
3. Egg Turning: The Gentle Cycle:
- Frequency: Regularly turn the eggs to prevent the embryo from sticking to the shell.
- Method: If your incubator doesn't have an automatic turner, turn the eggs 2-3 times per day.
- Angle: Turn the eggs about 90 degrees.
- Turn the eggs 3-4 times a day on days 13-14.
- Stop Turning: Discontinue turning the eggs around day 18.
4. Ventilation: Ensuring Fresh Air:
- Importance: Adequate ventilation is essential for the developing embryo, but avoid excessive ventilation that could affect temperature and humidity.
Post-Hatching Care: Nurturing the Chicks
Once the Rutin Chicken chicks hatch, the focus shifts to their immediate care and long-term health.
1. Brooder Preparation:
- Setting Up: Prepare a brooder, a warm and secure environment.
- Temperature: Maintain a brooder temperature of around 36ᄚC (97ᄚF) initially, gradually decreasing it by a few degrees each week.
- Warmth: Provide a heat lamp or other heat source.
2. Chick Handling and Introduction to Food and Water:
- Removing Chicks: Once the chicks are dry, gently remove them from the incubator.
- First Drink: Offer chicks fresh water immediately, sometimes with a little sugar or electrolytes.
- Feed: Offer a chick starter feed with 20% protein, to ensure the chicks get the best start.
3. Feeding and Care:
- Food: Provide chick starter feed.
- Water: Keep fresh, clean water available at all times.
- Environment: Keep the brooder environment clean, dry, and well-ventilated.
- Bedding: Use absorbent bedding like wood shavings to keep the area dry and odor-free.
- Cleaning: Remove wet bedding daily and replace it.
Common Challenges and Solutions
Be prepared for potential issues and know how to address them.
1. Embryo Mortality:
- Possible Causes: Temperature fluctuations, improper humidity, or egg quality issues.
- Solution: Carefully monitor and adjust incubator settings, and use fresh, high-quality eggs.
2. Chick Deformities:
- Possible Causes: Incubation temperature or humidity issues, or egg defects.
- Solution: Discard deformed chicks.
3. Disease Prevention:
- Preventive Measures: Maintain a clean brooder environment, disinfect equipment, and consider vaccinations.
Monitoring, Patience, and Ongoing Learning
- Candling: You can candle the eggs to monitor embryo development.
- Patience: Be patient, as hatching can take up to 21 days.
- Continuous learning: Stay informed, read and research.
By following these guidelines, you can significantly increase your chances of successfully incubating and raising healthy Rutin Chickens. Remember that every hatch is a learning experience, so take detailed notes and make adjustments as needed.
Related Posts
The Life Span Of A Rutin Chicken Is Several Years?
The life expectancy of the rutin chicken is generally about 2-3 years. It is an extraordinary chick bred from the cross between the spotted-winged partridge.
Raising Rutin Chickens To Achieve Egg Freedom
Recently, a netizen shared his reeded chicken on social media platforms and said he hoped to achieve “egg freedom” by raising chickens, causing concern.
Do Rutin Chickens Lay Eggs Every Day
How many eggs does a rutin chicken lay a day? One rutin chicken can lay one egg a day. Rutin chicks can generally start laying eggs after 50 days of breeding and breed around June to August.
Notice: Internet users spontaneously contributed the article content, and the article views only represent the author himself. This site only provides storage services, does not have ownership, and bears relevant legal liabilities. If you find plagiarism, infringement, or illegal content, please contact the administrator to delete it.